Tuesday, March 4, 2014

JUNOS automation, NETCONF

Introduction

JUNOS supports NETCONF protocol which is XML-RPC based mechanism to communicate
with router/firewalls (any thing that runs JUNOS). Get information to and from the JUNOS,
Upgrade devices remotely. Make applications either web based or right on the JUNOS device.

I am rather interested in some thing new, as I like SNMP protocol and have built many web based applications for monitoring and configuring devices, gathering statistics for network planning and other useful stuff. I am interested in a web based NETCONF application because if you want to transport a VLAN over a network from point A to point B, it does not make sense of making scripts on individual JUNOS device but make a script on a central server which then deploys it to each and every device in-path.

Juniper's CLI is a itself client to NETCONF protocol.


NETCONF
Mgd daemon is responsible for the NETCONF procotol. JUNOS runs NETCONF over ssh,

lets enable the ssh procotol.

[edit]
root# set system services ssh    
[edit]
root# set system services netconf ssh

now access a linux machine and execute the following command

root@nms:~# ssh root@192.168.3.4 -s netconf
root@192.168.3.4's password: 

JUNOS will reply like the following,

<!-- No zombies were killed during the creation of this user interface -->
<!-- user root, class super-user -->
<hello>
  <capabilities>
    <capability>urn:ietf:params:xml:ns:netconf:base:1.0</capability>
    <capability>urn:ietf:params:xml:ns:netconf:capability:candidate:1.0</capability>
    <capability>urn:ietf:params:xml:ns:netconf:capability:confirmed-commit:1.0</capability>
    <capability>urn:ietf:params:xml:ns:netconf:capability:validate:1.0</capability>
    <capability>urn:ietf:params:xml:ns:netconf:capability:url:1.0?protocol=http,ftp,file</capability>
    <capability>http://xml.juniper.net/netconf/junos/1.0</capability>
    <capability>http://xml.juniper.net/dmi/system/1.0</capability>
  </capabilities>
  <session-id>4509</session-id>
</hello>
]]>]]>

XML output shows the connection is established and JUNOS has just welcomed you to it's NETCONF interface.

execute a command and see what JUNOS replies, paste the following into same sshd session

<rpc message-id="1" xmlns="urn:ietf:params:xml:ns:netconf:base:1.0">
<get-system-uptime-information/>
</rpc>

The above command retrieves information from the device about the uptime of the JUNOS access via ssh.

<rpc-reply xmlns="urn:ietf:params:xml:ns:netconf:base:1.0" xmlns:junos="http://xml.juniper.net/junos/9.1R2/junos" message-id="1" xmlns="urn:ietf:params:xml:ns:netconf:base:1.0">
]]>]]><system-uptime-information xmlns="http://xml.juniper.net/junos/9.1R2/junos">
<current-time>
<date-time junos:seconds="1366935506">2013-04-26 00:18:26 UTC</date-time>
</current-time>
<system-booted-time>
<date-time junos:seconds="1366933535">2013-04-25 23:45:35 UTC</date-time>
<time-length junos:seconds="1971">00:32:51</time-length>
</system-booted-time>
<protocols-started-time>
<date-time junos:seconds="1366933734">2013-04-25 23:48:54 UTC</date-time>
<time-length junos:seconds="1772">00:29:32</time-length>
</protocols-started-time>
<last-configured-time>
<date-time junos:seconds="1366933868">2013-04-25 23:51:08 UTC</date-time>
<time-length junos:seconds="1638">00:27:18</time-length>
<user>root</user>
</last-configured-time>
<uptime-information>
<date-time junos:seconds="1366935506">
12:18AM
</date-time>
<up-time junos:seconds="2001">
33 mins
</up-time>
<active-user-count junos:format="1 user">
1
</active-user-count>
<load-average-1>
0.16
</load-average-1>
<load-average-5>
0.03
</load-average-5>
<load-average-15>
0.03
</load-average-15>
</uptime-information>
</system-uptime-information>
</rpc-reply>
]]>]]>

]]>]]> is used to represent the end of XML-RPC message, this will normally always be used in request/response messages.

The above XML reply can be formatted to display it in more readable format, which can be done using any XML parser.

Thank You,

Sunday, April 28, 2013

Networking VirtualBox and qemu instances on windows

It is quite simple,

1. Run qemu instance with tapX interface (X is 0 to n)
2. Bridge Virtualbox's "VirtualBox Host-Only Network" Adaptor and Qemu's Tap interface.
3. Assign IP address to Network Bridge Interface, this will let you access Qemu and VB intances from windows.
4. Assign IP addresses to Qemu (guest OS) and VirtualBox (guest OS) in the same subnet.

You must be able to PING from both guest OSes and from windows HOST OS as well.


I  used this setup to access JUNOS (qemu) from Linux (virtual box) for practicing NETCONF protocol.


Sunday, April 21, 2013

How to access JUNOS Olive Serial on VirtualBox and vmware

I went through many how-tos this week regarding making a new Olive on VirtualBox, all were great only one thing which almost every one has missed was how to get the JUNOS CLI for the first time because for the first time the VirtualBox or any other Virtualization software that you are using will never show a prompt after the OS starts to boot, If you are running VirtualBox on windows.


Here is the process,


The First Part, Creating Virtual  Machines and installing JunOS is already very well explained and documented, so i dont want to re invent the wheel.

Follow the following URLs and get yourself able to install JunOS version of your choice,

NOTE:

If you want to avoid the unpacking junos, replacing it's checkpic binary and repacking, calculating the SHA1 and md5 checksums again use the following script, it will automatically unpack change the checkpic binary and pack the installer back again.

http://forum.gns3.net/download/file.php?id=520&sid=a010b8d818fa415e7c54a1850568e090


http://daemonkeeper.net/563/deploy-junos-on-a-virtualbox-virtual-machine/
http://blog.gns3.net/2009/10/olive-juniper/3/


The only way for this is to divert serial data (a named pipe) to a gateway, redirecting the named pipe to a tcp port and vice versa and then access that TCP port using any telnet client.

The first time you boot the JunOS the prompt will disappear as soon the OS is booted. Here you need a method to access the JunOS CLI and assign it an IP address which you can access use to telnet/ssh the router.

In VirtualBox locate to 'Serial Ports' Do the settings same as in the following image,


In Vmware


download, vmwaregateway.exe from here (for more details, http://www.l4ka.org/91.php).
download any telnet client, e.g, Putty.

open command prompt on your host OS, locate the PATH to vmwaregateway.exe, run the software as following,
c:\>vmwaregateway.exe /t

This software creates a named PIPE named called \\.\pipe\vmwaredebug and creates TCP socket to port 567. Open Putty telnet your localhost to port 567.

That's it you have access to JunOS run CLI and assign an IP address to the interface required.

Thursday, January 31, 2013

TP-Link, openwrt, openflow bro-ids and usb flash mounting

OpenWRT, OpenFlow and bro-ids on TP-Link TL-WR1043ND


I was given a task to mount USB Flash on tp-link router, here's how I did. here you can find detailed information about this hardware.


The development platform I used is ubuntu vm on virtualbox.
lets start the build process:

Building the image

apt-get install build-essential binutils flex bison autoconf gettext texinfo sharutils subversion libncurses5-dev ncurses-term zlib1g-dev gawk 

mkdir ~/ofwrt
cd ~/ofwrt

svn co svn://svn.openwrt.org/openwrt/trunk/
cd trunk/
sudo ./scripts/feeds update -a
sudo ./scripts/feeds install -a
cd ~/ofwrt/
git clone git://gitosis.stanford.edu/openflow-openwrt
cd ~/ofwrt/trunk/packages/ 
ln -s ~/ofwrt/openflow-openwrt/openflow-1.0/
cd ~/ofwrt/trunk/ 
ln -s ~/ofwrt/openflow-openwrt/openflow-1.0/files
cd ~/ofwrt/
 
make menuconfig
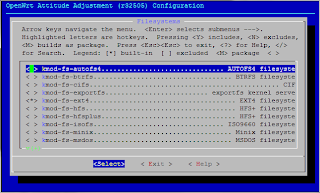
  • Select your platform for Target System (Atheros AR71xx)    Target System (Atheros AR7xxx/AR9xxx)  --->
  • Target Profile (TP-LINK TL-WR1043N/ND)  --->
  • Kernel modules  --->     
    • Filesystems  --->
      •  <*> kmod-fs-vfat..................................... VFAT filesystem
  •  --- kmod-usb-core............................................ Support
    •  <*> kmod-usb-ohci............................... Support for OHCI
    •  <*>   kmod-usb-serial-option................... Support for Option
    •  <*> kmod-usb-storage..................................... USB Storage
    • <M> kmod-usb-storage-extras.................... Extra drivers for usb-storage                                                                             
    •  <*> kmod-usb-uhci............................... Support for UHCI controllers 
    •  <*> kmod-usb2................................... Support for USB2 controllers
    •  <*> kmod-usb-uhci............................... Support for UHCI controllers
  • Save & Quit
  • I could not find few of the lines in menuconfig thats why I added them manually.
  • cd trunk
  • vi .config
  • uncomment the following lines and put =y at the end
    • CONFIG_PACKAGE_kmod-nls-base=y
    • CONFIG_PACKAGE_kmod-nls-cp437=y

  • Select OpenFlow package under network
  • Select tc package under network
  • Select kmod-tun under Kernel Modules->Network Support
  • in Target Images -> select  [ ] ramdisk  --->
  • Save and Exit


  • Add support for queueing : 
  • make kernel_menuconfig 
  • Under Networking Support->Networking options->QoS and/or fair queueing select Hierarchical Token Bucket (HTB)
  • Save and Exit
  •  

  •  
Build the image

makeV=99

Upgrading the Router
 
1. ssh or telnet the router copy 'openwrt-ar71xx-generic-tl-wr1043nd-v1-squashfs-sysupgrade.bin' file from your development system to your tp-link.
2. populate your /etc/sysupgrade.conf
   add file and directory names where which you want to preserve during upgrade, i have added /etc/config/ only to save my network configurations.
3. sysupgrade -v /tmp/openwrt-ar71xx-generic-tl-wr1043nd-v1-squashfs-sysupgrade.bin
After the upgrade the router will reboot with new image. For more information on upgrade visit here
 
Mounting the USB Flash:
before mounting verify usb kernel support,
lsmod | grep usb
lsmod | grep vfat
lsmod | grep nls

if any of the above are missing you can add them using insmod kmod-fs-fat (example)

if all the above modules are present go ahead
mkdir -p /mnt/usb # directory where Flash should be mounted.

mount -t vfat /dev/sda1 /mnt/usb

ls /mnt/usb # here you should be able to see all the files on flash.

Mounting flash on startup

vi /etc/config/fstab 

config 'mount' 
      option 'device' '/dev/sda1' 
      option 'options' 'rw,sync' 
      option 'enabled_fsck' '0' 
      option 'enabled' '1' 
      option 'target' '/mnt/share'
 
And to make the fstab settings effective in current session run:
/etc/init.d/fstab start
To make the fstab settings effective after every reboot run:
/etc/init.d/fstab enable

start the openflow service...
/etc/init.d/openflow start

root@OpenWrt:~# /etc/init.d/openflow start
eth1.1
Configuring OpenFlow switch for out-of-band control
No need for further configuration for out-of-band control
Jan 25 12:52:24|00001|vlog|INFO|opened log file /var/log/ofprotocol.log
Jan 25 12:52:24|00002|secchan|INFO|OpenFlow reference implementation version 1.0.0
Jan 25 12:52:24|00003|secchan|INFO|OpenFlow protocol version 0x01
Jan 25 12:52:24|00004|secchan|WARN|new management connection will receive asynchronous messages
Jan 25 12:52:24|00005|rconn|INFO|unix:/var/run/dp0.sock: connecting...
Jan 25 12:52:24|00006|rconn|INFO|tcp:192.168.1.2:6633: connecting...
Jan 25 12:52:24|00007|rconn|INFO|unix:/var/run/dp0.sock: connected


root@OpenWrt:~# ps | grep of
3 root 0 SW [ksoftirqd/0]
1355 root 1268 S ofdatapath punix:/var/run/dp0.sock -i eth1.1 --no-lo
1371 root 1068 S ofprotocol unix:/var/run/dp0.sock tcp:192.168.1.2:66
1373 root 1500 S grep of


if you have successfully installed the package, both daemons ofdatapath and pfprotcol must be running.

lets install bro-ids

wget http://sysnet.org.pk/upload/rc_shrimpFiles/openwrt-bro.tar.gz

it will download and install dependencies.
http://www.openflow.org/wk/index.php/OpenFlow_1.0_for_OpenWRT

Tuesday, January 29, 2013

IOS hardware inventory script

Once i was asked to create an excel file of the hardware inventory, one way was to telnet each router execute few commands and manually copy paste the lines to excel file but this was a clerical job so i made a script that collects all this information from the IOS devices.

Prerequests:
  • Linux machine with Perl installed
  • apt-get install net-snmp (debian)
  • yum install net-snmp (redhat based)
  • input.txt (a simple IP address list of the devices)
  • set the correct snmp  to variable $snmpro="your_comm";
  • result.csv will generate the output file with all the required serial numbers and card details.
  • Put all the files in same directory
Troubleshooting:

perl -v

check if perl installed, if perl is install it will prompt the version of perl install otherwise perl is not installed.


snmpget -v2c -c public IP_Address 1.3.6.1.4.1.9.2.1.3.0

provide the correct community and IP address of snmp agent, it should return the host-name of the agent. otherwise you can paste your problem on this blog and ill try my level best to reply ASAP.


vi inventory.pl
open your fav editor and paste the code in the code section.

Execution:
perl scriptname.pl # perl inventory.pl

Some important and Usefull OIDs:

iso.3.6.1.2.1.47.1.1.1.1.11.1 motherboard oid
iso.3.6.1.2.1.47.1.1.1.1.11.21 device
iso.3.6.1.2.1.47.1.1.1.1.13.1 device name
1.3.6.1.2.1.47.1.1.1.1.11 serial numbers
1.3.6.1.2.1.47.1.1.1.1.13 names
1.3.6.1.4.1.9.2.1.3.0 hostname


#!/usr/bin/perl
$snmpro="public";
$rtrlist="input.txt";


open (RTR, "input.txt") || die "Can't open $rtrlist file";
open (LOG, ">result.csv") || die "Can't open $workingdir/RESULT file";
open (ERR1, ">err.log") || die "Can't open $workingdir/RESULT file";

while (<RTR>) {
  #print $_;
  chomp($rtr="$_");
  $snmpget=`snmpget -v2c -c $snmpro $rtr 1.3.6.1.4.1.9.2.1.3.0`;
  
  if ($snmpget =~ /Timeout/) { print ERR1 "cant open $rtr\n"; print "can't open $rtr.\n"; } else
  {
  @str = split (/\=/,$snmpget);
  @hostname = split (/ /,$str[1]);
  print $hostname[2];
  chomp($hostname[2]);
  
 }


  @snmpname = `snmpwalk -v2c -c $snmpro $rtr 1.3.6.1.2.1.47.1.1.1.1.13`;
  @snmpserial = `snmpwalk -v2c -c $snmpro $rtr 1.3.6.1.2.1.47.1.1.1.1.11`;
  $line_num=0;
  foreach (@snmpname) {
        chomp ($_);
        @name = split (/\=/,$_);
        @name1= split (/ /,$name[1]);
        if($name1[2]) {
        chomp($snmpserial[$line_num]);
        @serial1= split (/\=/,$snmpserial[$line_num]);
        @serial = split (/ /,$serial1[1]);
        print $name1[2]."=".$serial[2]."\n";
        print LOG $rtr.",".$hostname[2].",".$name1[2],$serial[2]."\n";
        }
       
   
    $line_num++;
  }
  #print @snmpname;
  #print @snmpserial;
  #printf LOG ("%-12.12s; %-30.30s; %-25.25s; %-12.12s\n", $RTR, $LOC, $CON, $SIN);

  }
close (RTR);
close (LOG);
close (ERR1);


DOS batch file auto ftp files


This script uploads files msg.txt and on a specified interval from an ftp client (this computer) to an FTP server on MS windows platforms.


rem display whats going on when this script runs.
@echo on

rem ftp is a MS command line FTP protocol client used to upload/download files rem via FTP protocol, -s specifies the ftp commands to be executed from ftp.src
ftp -v -s:"ftp.src"
rem then the batch file it is calling looks like this:

rem truncate/empty the msg.txt after upload.
echo. 2>msg.txt

rem log "what happpens" every time the script is execute to a file called sms.log
echo %TIME% >> sms.log


SRC.TXT

rem src.txt could be any text file that holds ftp commands
src.txt
open 10.1.4.65 rem ftp server's IP address.
username
password

rem filename to upload and command/
put msg.txt
put src.txt

rem quit after above commands are executed.
quit


To automate this process or schedule it to run on a specific time.

Start->accessories-system tools->task scheduler